Installation Instructions and Precautions
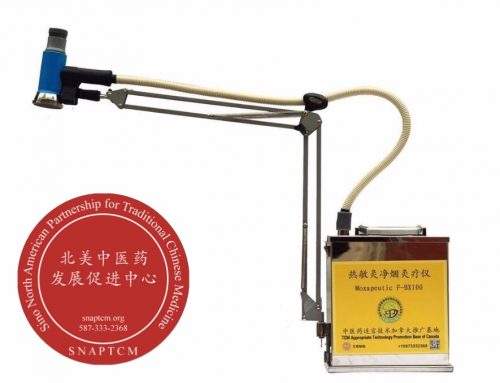
- As shown in the picture above: remove the U-shaped pin on the bottom of the bracket, insert the post at the bottom of the adjustable arm into plastic lined bracket on the side of the main unit.
- Connect the smoke guide pipe to the moxibustion head, ensure a tight connection. When the moxibustion is sturdy and adjusted, attach the smoke guiding pipe into the pipe guide clamp ring to make it straight with the support.
- Connect the 12V DC power supply, adjust the power switch knob to adjust the suction
Instructions for Usage
- Turn on the machine, Remove the head cap of the moxibustion head, insert the moxa stick into the inner tube of the moxibustion head, remove ash filter and light the moxa stick. Then attach the ash filter.
- Adjust the stabilizer to the right position on the patient (add the ash filter to prevent the ash from falling onto the skin and burning the skin) or use the moxa stick without the stabilizer clamp (caution: it is suggested that an insulated cloth should be used to protect your hands from the heat of the ash net when removing the ash net to empty out the ash)
- The lower end of the inner pipe is burning the moxa stick, and the opening size of the steel claw can be adjusted according to the thickness of the moxa stick
- The rubber insert and the moxibustion head interlock. However, please be cautious to prevent the insert from falling off during the use.
- The lower end of the moxibustion head is very close to the fire. If the temperature rises after a certain period of time, so please pay attention to prevent burning your patient.
- When finished, the insert within the moxa head can be removed and inserted into the moxa stick to extinguish the cover
Maintenance Instructions
- Separate moxa head from insert is made up of internal and external tubes, such as when the pollutants between internal and external tubes are too much, please separate the inside and outside tubes, put them in the cleaning liquid, soak for two hours, carefully scrub the components, dry and reassemble the moxa head
- When the suction strength of the instrument is reduced, the primary filter cotton in the main unit should be replaced. To do so, remove the old core should be removed, and the new one should be put on
- the machine is in normal use for one month (about 100 hours). Open the top cover of the machine, inspecting the air holes when cleaning and replacing the first grade filter cotton. Typically, clean moxa head and outer cover after thirty uses, use gauze dipped in alcohol to clean the inner wall tar, use the inner tube cleaning device to clean the tar from the inner tube. Inspect the pipe guide mouth for damages. Monthly, dust, clean up, and clear the connection between the pipe guide, the machine and moxibustion device.
- After using the bracket for a period of time, it is necessary to tighten the brackets and screws to ensure proper placement.
FBX 100 Assembly Instructions
Your package should include the following:
1 – Main filtration Unit
2 – Hose attachments
2 – Moxa head attachments of varying sizes
1 – rounded scraping tool
1 – cylindrical extinguisher
3 – replacement filters
1 – adjustable arm
1 – spare clamp for adjustable arm
2 – power supply and adjuster
You may also watch our unit assembly online at https://www.youtube.com/watch?v=QcYbValMlv8
Assembly instructions
Step 1
Place your filtration unit on a secure surface. Collect the adjustable arm and remove the metal pin found at the base of the arm. Line up the post of the arm with the plastic gasket on the side of the filtration unit. With moderate pressure insert the arm into the plastic gasket until the post is completely inserted into the gasket.
Step 2
Collect one of the hose attachments, insert the grey silicon end into the metallic opening on the top of the filtration unit.
Step 3
Collect a moxa head of your choice and insert the metallic opening on the side of the moxa head into the black handle of the hose attachment. Thread the hose through the hose guide on the adjustable arm
Step 4
Remove the tape covering the output of your filtration machine and insert the power supply into your filtration unit and the power plug into the wall.
Your unit is now ready for use.
If you have any difficulty assembling your unit please:
email dr.kyle.picard@snaptcm.org
or
Phone 587-333-2368
Thank you and enjoy your newly assembled FBX 100 Moxapeutic device.

.jpg)


